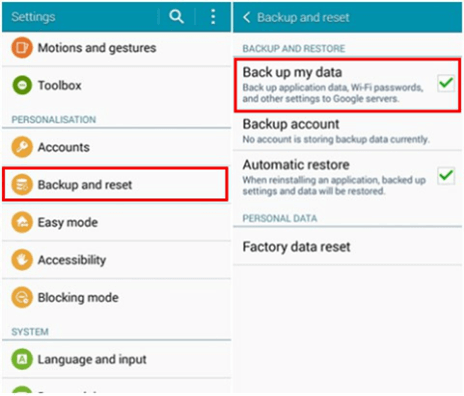
 Regularly backing up your own Android mobile data is a fantastic habit. Contacts, text messages, photographs, songs, and videos have been valuable luck for the Android user. To protect this advantage is so significant that each Android user must have their approaches to make a replica of it. And what is your strategy? Personallypersonally, I always back up Android telephone straight with mobile telephone, draging and droping files into pc, utilizing MoboRobo or Gmail. Strategy 1: Immediately Back up Files with Android Phone Strategy 2: Back up Android Phone Utilizing MoboRobo Strategy 3: Back up Android Phone into Gmail Strategy 4: Drag and Drop Android Files Strategy 5: One-Click Backup With FonePaw Android Data Backup & Restore Strategy 1: Immediately Back up Files with Android Phone Then pick "Back my info". Straight Back up Files with Android Phone Strategy 2: Back up Android Phone With MoboRobo Measure 1. Start MoboRobo in your PC. Then connect your own Android phone to the pc using a USB cable. Wait until the unit is recognized and detected. Click on "Backup" in the pillar. Measure 2. It may take a while. Then you may pick a route to store your backup file. After that, click on the "Quick Backup" button. When the backup is finished, the processing pub will visit 100%. Anyway, the backup will be kept in your PC. Notice: To renew Android documents, in the primary port of Moborobo, select "ToolBox" and locate "Restore" option. Pick the backup file you would like and hit "Restore". Strategy 3: straight up Android Phone into Gmail Step 1 Find Google Account Step Two Signal in Gmail Account Sign in with your Gmail password and account. If you do not have a Gmail account, then tap "Create" to create a Gmail account. Harness the "Sign in", select files you wish to sync, like calendar, contacts and click on "Finish". Back up Android Phone into Gmail Strategy 4: Drag and Drop Android Files It's the conventional approach to back up media files, like photographs, videos and audio onto your own Android phone. Step 1 Connect Your Phone to Display Connect the telephone to your computer via USB cable, then select "Use USB to get MTP/PTP" and discover the driveway (on the background for Mac, from My Computer for Windows). Step 2 Drag the Documents Open the driveway, locate the folders which save photos or alternative media files, and then drag the files you need on a folder from the computer. It's recommendable to construct a new folder using the title for example "copy of Android telephone" so that it is possible to get the backup files readily. 1. Install FonePaw Android Data Backup & Restore in your PC. Then join your device to the PC and enter Android Data Backup & Restore feature. 2. Pick One-click Backup or Device Data Backup to store your mobile info. 3. If select "Device Data Backup", please choose particular data type and choose whether to encrypt your backup. 4. Await the backup procedure until it's completed. Do you believe it useful? And would you have simpler and practical method? Do not wait! Speak with us by leaving messages sending an email address. Your messages will be welcomed and valued.
1 Comment
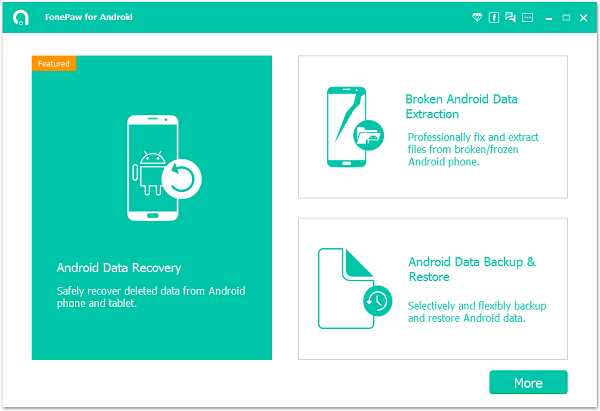 The Nexus 5 remains on Android 6.0 Marshmallow though it is running another construct...." - GotId Be Mobile It's not hard to operate wrongly in your Google Nexus 5 because it's some new features and operate another construct today. This will cause information loss from the telephone, like contacts, text messages, WhatsApp memessages photographs, videos, and audios. If you'd like to restore lost files out of Google Nexus but don't have any backup on your library, then attempt FonePaw Android Data Recovery, an efficient piece of software supports recovery of missing files out of Android. What could be revived with FonePaw Android Data Recovery? Contacts: title, telephone numbers, email address, business, job title, etc.. Messages: text contents, contact number, title, timing, etc.. WhatsApp: WhatsApp discussions, photographs, videos, etc.. Telephone logs: telephone number, title, telephone types, timing, etc.. Pictures: full-length picture, title, format, etc.. Videos: total movie, title, format, etc.. How To Recover Information from Google Nexus 6P/5X/5 Measure 1. Establish FonePaw Android Data Recovery in your own Windows/ Mac personal computer. Then join Google Nexus 5 on the pc. Switch on USB debugging mode in your telephone. Then the daemon is going to be discovered. Measure 2. From the next display, you can choose file types to scan, by way of instance, contacts, messages, call logs, photographs, videos, audios, and files. Measure 3. Allow Super User Ask The applications have to acquire privilege to scan files that are deleted. When there's a pop-up window onto your device, please reach "Permit" on the device and ensure that the petition has been recall forever. When there's absolutely no such pop-up window onto your device, please click on "Retry" in your own pc and try again. Measure 4. The software has prthe privilegeow. It takes a while to scan your own Android files. Following that, you may pick your preferred document types to preview. It's possible to change on the click and place to display only deleted files. Then highlight items that you desire and click on the button "Recover" and retrieve deleted files from Nexus 5. Incidentally, there are restored files saved in your PC. Last however, frequently back up your precious documents in the event of a collision data reduction. 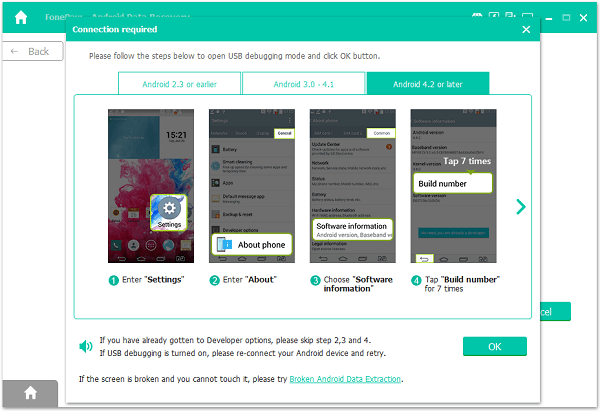 "I know that it's absolutely crucial to generate a backup for WhatsApp messages. The thing is that I did not understand it before my WhatsApp messages was deleted from my HTC 10. What if I do?" Since WhatsApp was a frequently used communication channel for our families, friends as well as business partners, it might be quite worrying once the injury described above occurs. In the event the situation really occurs to you, my proposal is: try to not run your HTC telephone to steer clear of the present information being uninstalled, and allow FonePaw Android Data Recovery helps you revive your WhatsApp messages from HTC. FonePaw Android Data Recovery is a specialist in data retrieval for tablets on Android 2.1 to Android 8.0. HTC is among the many supported apparatus. With this intellectual applications, it is easy to revive WhatsApp messages and WhatsApp attachments in your HTC U11, HTC U Ultra, HTC One 10/One M9+/ One M8/ / Desire825, etc. in easy measures. Free download the trial edition of FonePaw Android Data Recovery right today and then start to recoup your own WhatsApp messages from HTC. STEP 1 Connect HTC into PC When the USB debugging is off in your HTC, flip it by after the instruction displayed on the computer software. STEP 2 Pick WhatsApp Messages to Restore After your HTC was linked to the pc, you'll have the ability to select the file type to revive. For the interest of time, select only WhatsApp messages to recuperate by simply ticking "WhatsApp" and "WhatsApp Attachments". Click "Next" to scan your own cell phone. STEP 3 Permit the Request to Get Your HTC To revive WhatsApp messages to you, it's crucial to provide rights to PC to your document scanning component. Thus, when the under window pops up, start your HTC telephone and tap "Allow/Grant/Authorize" on the pop up window. Tick those messages that you need to revive, and click "Recover". The messages will then be retrieved and saved on the pc in CSV/HTML format. Using FonePaw Android Data Recovery, information retrieval can be this simple. It's genuinely a must-have application for Android users. 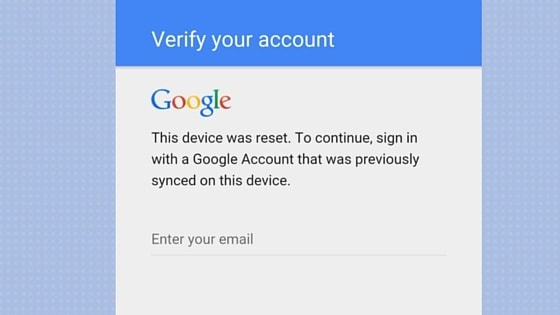 Samsung and Google are actually serious about your privacy and security, they are presently taking the proper steps to secure your personal information. The majority of us are pleased with the safety but at precisely the exact same time, you will become annoyed when you are locked out of your apparatus and not able to acquire access to it because of FRP lock.
So for instance, in the event that you lost your device or somebody wipes info factory reset it with no permissions and you have empowered factory reset security then Google will request account credentials which were used to install your Google account and password or Samsung accounts. Samsung's older devices like the Galaxy S3, S4, Notice 3 etc weren't with this attribute but the recently released devices like Galaxy J5, J7, Galaxy C5, Galaxy Note 5, S6 Edge, S7 Edge, Galaxy S8, and S8 Plus are getting it and should you hard reset your cellphone utilizing retrieval, you are sure to receive your phone locked if you don't supply the ideal Google accounts confirmation, it had earlier. Typically, users overlook their password or email and are stuck onto the Google confirmation display. However, you don't to possess stress because I have got you covered. As a result of the anonymous programmer who has launched an APK program which is able to allow you to skip the Google account confirmation measure and erase everything to get access back to a regular Samsung Galaxy device. This device has been flashed. To keep, sign in using a Google Account which has been formerly synced on this gadget. The Way to skip Factory Reset Protection on Samsung apparatus 2018 Before you Begin, You will Have to Have access to some of those 2 things: In case you've obtained OTG cable then follow those steps. Measure 2: Duplicate the apk file into your USB. Measure 3: Together with the OTG cable connect your USB to call. Measure 4: Once joined, it is going to popup the file manager program and set up the apk program. Measure 7: Harness Factory info reset and Reset device or Erase everything that will erase the next from the device: Measure 8: Eventually your telephone will reboot normally and might take some time whilst booting and that's normal after resetting your device. 2. It's virtually like the initial method, but rather than employing the OTG cable you are likely to use your PC. Measure 1: Download and Download SideSync APK. Measure 2: Run SideSync program on your computer and connect your phone with the USB cable. Measure 3: You should Find a popup as shown on the display below: Measure 4: Harness Chrome to get the skip app apk. Input the following to the URL bar: Https://goo.gl/W3cJQ4 Measure 5: as soon as you get into the apk file, tap to start the Samsung Apps. It will ask you to set up the SideSync in your device but hunt for ES File Explorer and install it. Measure 7: Proceed to download folder and then execute the skip app apk to put in it. Measure 8: you ought to have Settings menu available, scroll down and locate Backup and reset. Measure 9: Harness Factory info reset and Reset device. Measure 10: That is it! You have finally unlocked your apparatus. Hey, It is not over yet... I am hoping at the end of this step-by-step guide you have successfully bypassed FRP. If in the event you were not able to perform this, then here are my ideas and should work 100%. You want to downgrade Android variant, if at all possible. Search Factory Reset Protection was launched using Android 5.0 Lollipop, in which it had been in beta phases and consequently it was easy to skip. If you're able to take action by following our downgrade manual initially then follow the very same directions above. It's only available for elderly devices like Galaxy S5, S4, Note 4, Note 3 and Galaxy J and Galaxy A sequence. It's clear now and I have been receiving mails from a variety of subscribers that method has ceased functioning. Fortunately, today we've got superior FRP unlock solutions which enable you to unlock your device in just 24 hours however the drawback is, it's paid. If you are ready to pay a little fee subsequently unlock junky has a flawless service which offers unlock services for many Samsung and LG devices supported regardless of what Android variant running on your apparatus; Android Marshmallow or Nougat. A fantastic news for Progeeks site readers, it is possible to get 10% OFF your purchase by entering the coupon code "Progeek". Purchase Now If the above method doesn't work on your apparatus. I'm sure this one will work 100 percent as of today: Can you find it beneficial? If so, please leave your comments in the comment section below. If you are trying hard to get back entry to a Samsung Galaxy, then don't hesitate to tell us and we'll try our very best to reply to your questions. 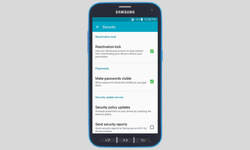 As most of us know, with the launch of Android 5.0 Lollipop Google introduced a new security feature known as Factory Reset Protection that's geared toward protecting users confidential information if in case your device is lost, lost or stolen.
But at precisely the exact same time, a range of Android users have got into trouble with it and locked from the apparatus. Becuase, they've abandoned their Samsung or Google account credentials following hard reset their apparatus. Ever since that time, many FRP bypass approaches have been published, and we have covered most of them especially for Samsung apparatus. All our skip methods are derived from the FRP skip APK file that can help you enter phone Wipe and Settings and Wipe your telephone data such as the Google or even Samsung account. If you are here reading this article, likely you are locked out of your apparatus and anticipating bypassing FRP with the apk document offered by an anonymous Android programmer. It's indeed among the very best FRP bypass programs which have helped tens of thousands of consumers to unlock their devices such as Samsung, LG, Google Pixel, Motorola, and Sony. Here's the download link for FRP Bypass Apk : Frp Bypass Apk Download 2018 Document Name: Samsung frp settings.apkDocument Size: 83.08 KB Document Type: application/vnd. After downloading the apk document, it is possible to follow remainder of the step-by-step guide about the best way best to skip FRP utilizing the program you have downloaded. If you are having any problems downloading the program apk or bypassing the Google accounts, don't hesitate to let us know in the comment section. As I mentioned previously, Android programmers are working towards making it more secure to secure their users and also make Android more protected since it's been criticized for its lack of safety. Likely this means each public method that's available to skip working now may not work elsewhere. However, there are always ways out.If you are always getting neglected to skip Factory Reset Protection in your device then attempt the following: Thus, If you are always getting neglected to skip Factory Reset Protection in your device then attempt the following: Downgrade Android variant in your Mobile Phone. The methods we have published were functioning on Android 5.0, 5.1.1 as well as 6.0 Marshmallow. So if it's feasible that you downgrade then go ahead and get it done and then follow our manual. Visit your regional Mobile applications store. They do it for cheap approximately 5 to 10 in minutes utilizing Android boxes. I expect you have successfully downloaded the FRP ape file. Let us understand and discuss your expertise in the comment section below. |
